How to Brew Oolong Tea the Traditional Way Without Being a Tea Snob
How to Brew Oolong Tea the Traditional Way Without Being a Tea Snob
I still remember the first time I tried oolong tea. I was about twenty-two, sitting in a tiny tea shop in Seattle, pretending I knew what I was doing. The owner poured me a cup of something golden and floral, and I nodded along like I could actually taste the “honeyed orchid notes” she’d just described. I couldn’t. I just knew it tasted really, really good, and I had absolutely no idea how to make it at home.
Fast forward more than a decade, and oolong is the tea I drink most days. Not because I’m fancy. Not because I’ve joined some secret tea society. But because it sits in this magical middle ground between green and black tea, meaning I can drink it in the morning without bouncing off the walls and in the evening without lying awake at 2 a.m. It’s forgiving, it’s complex without being intimidating, and once you learn the basics, it’s actually one of the easiest teas to brew well.
This is the guide I wish someone had handed me years ago. No pretension. No seventeen steps. Just the real, practical way to brew oolong tea at home, with a few mistakes I’ve made so you don’t have to make them too.
What Oolong Actually Is (The Short, Non-Snobby Version)
Oolong is a partially oxidized tea, which is a fancy way of saying it sits between green tea (unoxidized) and black tea (fully oxidized). That oxidation level is what gives oolong its huge range of flavors. Light oolongs can taste like fresh-cut flowers and sweet peas. Dark, roasted oolongs can taste like toasted bread, caramel, and stone fruit.
There are two big families worth knowing about:
- Green-style oolongs (like High Mountain Taiwanese oolongs or Anxi Tieguanyin) are lighter, brighter, and more floral. These want cooler water and shorter steeps.
- Roasted oolongs (like Wuyi rock teas or traditional Dong Ding) are darker, toastier, and more robust. These can handle hotter water and longer steeps.
The mistake I made for years was treating every oolong the same. They’re not. But here’s the good news: you don’t need to memorize a chart. You just need to start somewhere, taste what you get, and adjust from there. That’s the whole secret.
The day I stopped trying to memorize tea jargon and started actually paying attention to how things tasted in my cup was the day I finally started enjoying tea properly.
The Gear I Use (And What I Wish I’d Bought First)
That said, the gear I picked up over the years genuinely changed my daily tea ritual.
The All-Rounder: My Easy Pour Ceramic Set
For about three years now, my everyday workhorse has been the Easy Pour Ceramic Set in that gorgeous blue and white pattern. It’s the kind of set you see in old Chinese tea shops, except it actually works for a regular person who isn’t performing tea ceremony for an audience.
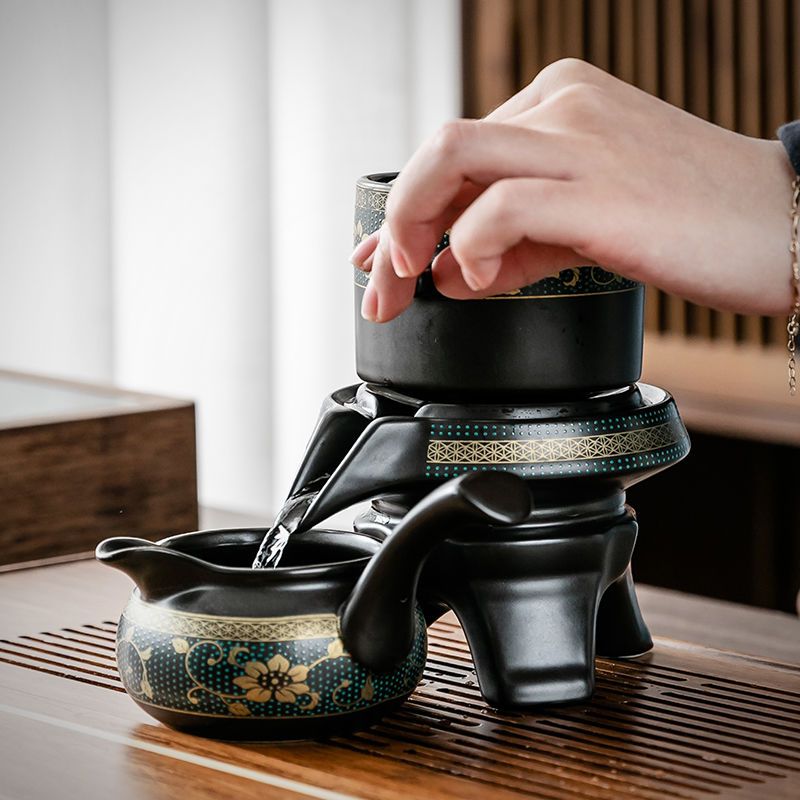
What I love about it is the rotating tray. Sounds gimmicky, right? It’s not. When you pour from a small teapot, drips happen. Having a tray that catches them means my desk doesn’t end up looking like a small lake every morning. The clay holds heat well, the pour spout is forgiving, and it looks beautiful on the counter, which honestly matters more than I thought it would. Drinking tea from something pretty makes me slow down, and slowing down is half the point.
My one honest complaint: the learning curve on the pour took me about a week. The first few times I used it, I either poured too fast and splashed, or I held back too much and got a tiny trickle. That’s not a flaw in the product, that’s just me learning a new pour. If you’ve never used a small clay teapot before, give yourself a few sessions before you decide whether you like it.
The Showstopper: Magnetic Glass Tea Maker
When I have friends over, this is the piece I bring out: the Magnetic Glass Tea Maker with the wooden stand. It looks like a little science experiment and I mean that as the highest compliment.
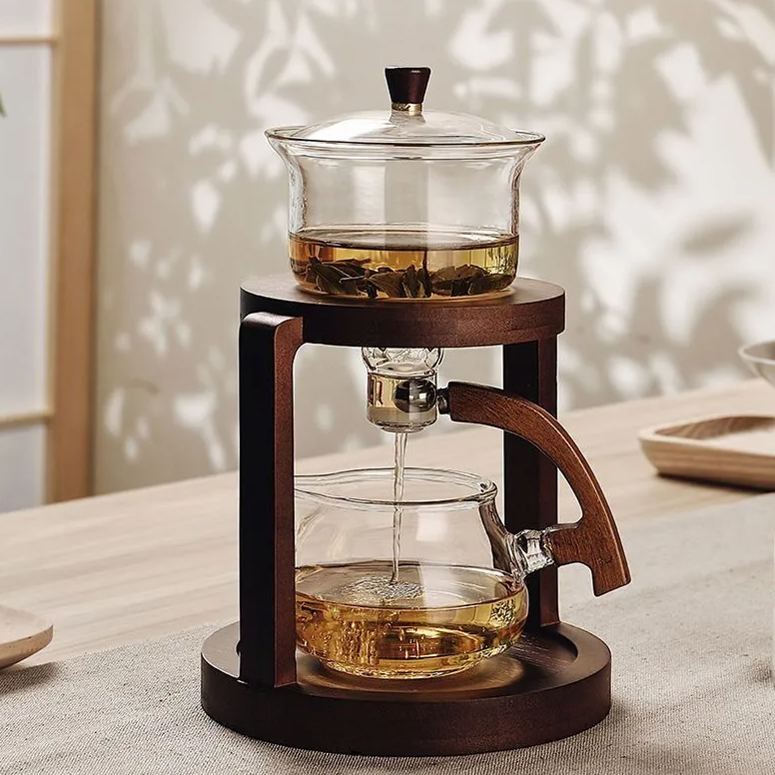
The glass is great because you can watch the leaves unfurl, which is half the fun of drinking oolong. The leaves dance. They open. They change color. It turns tea brewing into a tiny, calming performance, and guests always end up staring at it like it’s the world’s smallest aquarium.
What I will say honestly: the magnetic mechanism has a small “click” feel that takes a session to get used to. The first time I used it, I wasn’t sure if I’d pulled the magnet hard enough. But by the second or third use, it became second nature. And the wooden stand isn’t just decorative, it protects your table from the warm glass, which I learned the hard way after leaving a water ring on my dining table that is now part of the family history.
The Modern Daily Driver: Magnetic Glass Tea Set
When I want the glass-look experience but a more modern, minimalist vibe, I reach for the Magnetic Glass Tea Set. It’s similar in concept to the one above, but the design is cleaner and more contemporary, and it works beautifully as a single-person brewing setup rather than a showpiece.
This one lives on my kitchen counter. It’s the set I use when I’m making a quick cup while cooking dinner, or when I want to see exactly how my oolong is unfurling without dragging out the whole ritual. The magnetic lift is smooth, the glass feels substantial, and the design doesn’t clash with my very untraditional kitchen.
The trade-off: this set is a little smaller than the other one, so if you’re brewing for a group, you’d want to do multiple rounds. For solo daily use, though, it’s perfect. And the modern design actually makes it easier to clean, which is the kind of practical thing nobody talks about in tea blogs.
Water Temperature: Stop Overthinking It
This is the single most stressful topic in oolong tea online, and I genuinely think it stops more people from enjoying the tea than anything else.
- Light, green-style oolongs: Around 195°F (90°C). Not boiling. Just off the boil.
- Roasted, dark oolongs: A full boil, 212°F (100°C). Yes, really.
- When in doubt: Start at 195°F. You can always go hotter next time. You can never go cooler after you’ve burned the leaves.
For the first two years I brewed oolong, I did not own a temperature-controlled kettle. I used a regular kettle and just let the water sit for about 60 seconds after boiling before pouring. My tea was fine. My tea was actually good. The obsession with exact temperatures is, in my humble opinion, one of the biggest tea snob traps, and it makes new drinkers feel like they need a science lab to enjoy a cup of leaves.
If your only options are “boiling water” or “nothing,” use the boiling water. A slightly over-steeped oolong is still delicious. A perfectly brewed oolong you never made because you were scared of messing up is a tragedy.
How Much Tea to Use (The Honest, Imperfect Answer)
Every tea blog will give you a precise ratio. Mine included, in about three paragraphs. But here’s the truth from years of brewing: there is no perfect ratio. There is only the ratio that tastes good to you, in the vessel you’re using, on the day you’re drinking it.
That said, you have to start somewhere.
- For a small gongfu pot (around 100-150ml): About 5-7 grams of leaf. Yes, that looks like a lot. It’s supposed to.
- For a Western-style mug (around 250-300ml): About 2-3 grams, which is roughly one tablespoon of rolled leaves or two teaspoons of broken leaves.
- When in doubt: Start with less. You can always add more next time. Over-leafed oolong gets bitter fast, and bitter tea teaches you nothing good about the leaf.
A small kitchen scale is genuinely the best ten dollars I ever spent on tea gear. But a measuring spoon works fine too. I used spoons for years before I got a scale, and my tea was good the entire time.
The Actual Brewing Process (Western Style for Beginners)
If you only have a mug, a strainer, and some hot water, this is for you. This is how I brewed oolong for years before I got fancy.
- Warm your mug. Pour a little hot water in, swirl it around, dump it out. This sounds silly. It matters. A cold mug drops your water temperature the moment you pour in your leaves, and that temperature drop affects flavor.
- Add your leaves to the empty warm mug. Smell them. This is a small joy people skip. Smell the dry leaves before you brew them. You’ll start to learn what you like.
- Pour hot water over the leaves. Use the temperatures from earlier. Pour in a steady stream, not all at once. You’re waking the leaves up, not drowning them.
- Steep for 2 to 3 minutes. Set a timer. Don’t guess. The first time I made oolong, I “guessed” and ended up with something so bitter I thought I’d done something criminal.
- Strain the leaves out. Use an infuser, a strainer, or a teapot with a built-in filter. If you leave the leaves in, they’ll keep brewing and turn your cup into a tannin factory.
- Re-steep the same leaves 2-3 more times. This is the secret. One brewing of oolong is a tease. The second, third, and fourth steepings are where the magic happens, and they often taste different from each other, which is part of the fun.
That’s it. That’s the whole process. Everything else is refinement.
The Gongfu Method (When You’re Ready for It)
Once you’ve got the basics down, try gongfu brewing. It’s the traditional Chinese way, and despite its reputation as something only experts do, it’s actually easier than Western brewing once you get the hang of it. You just use more leaves and a smaller vessel with shorter steeps.
My current favorite setup is the Easy Pour Ceramic Set with about 6 grams of leaf and a 4-ounce pot.
- First steep: 15-20 seconds. Just a flash rinse to wake the leaves up. Some people drink this rinse. I usually do. It’s weak but it tastes alive.
- Second steep: 20-30 seconds. This is often the sweetest cup.
- Third steep: 30-40 seconds.
- Fourth steep and beyond: Add 10-15 seconds per round.
You’ll get anywhere from 5 to 8 steepings out of a good oolong, sometimes more. Each one tastes slightly different. The early ones are bright and floral, the later ones are deeper and woodier. It’s like watching the tea tell you a story across the session.
My honest beginner mistake with gongfu: I tried to pour too much into each cup the first few times and ended up with a six-ounce cup of tea at “15 seconds” steep, which is way too long. Keep your vessels small. The whole point is concentrated brews in tiny cups.
Common Beginner Mistakes (Including All the Ones I Made)
I’ve made every mistake on this list. Some of them more than once. If you’re just starting out, here’s what to watch for:
1. Using Water That’s Too Hot
Especially with green-style oolongs, boiling water scorches the leaves and brings out the bitterness. If your tea tastes like you licked a tree, it’s probably the water. Let it cool for a minute.
2. Steeping Too Long
The single most common oolong mistake. People think “more time equals more flavor.” Nope. More time equals more tannins, which equals bitterness. If your tea is harsh and astringent, steep it for less time next time. That’s it.
3. Using Too Little Leaf
I did this for years. I was scared of using too much, so I used too little, and my tea was always thin and watery. With oolong, you need enough leaves to fill the space. A teaspoon in a big mug is not enough.
4. Skipping the Warm-Up
Cold vessels drop your water temperature. Warm your teapot or mug first. It takes five seconds and it makes a real difference.
5. Treating Every Oolong the Same
A rolled, high-mountain oolong and a heavily roasted Wuyi rock tea want completely different treatment. When in doubt, ask the seller, or look up that specific tea. Most online tea shops have brewing notes on the product page, and those notes are gold.
6. Giving Up After One Bad Cup
My first attempt at brewing oolong was genuinely awful. I didn’t try again for two months. That was a mistake. The second cup wasn’t perfect either. The third was pretty good. The tenth was great. Tea is a skill, not a switch you flip.
Re-Steeping: Where the Real Value Lives
One of the things nobody tells new tea drinkers is that oolong is one of the most economical teas you can buy, precisely because you steep it multiple times. A $15 bag of good oolong can give you 30-40 cups of tea if you re-steep it properly. That’s about 40 cents a cup for something that would cost you $4-5 at a coffee shop.
The trick is to keep increasing your steep time with each round, because the leaves have already given up their easy flavor. By the fifth or sixth steeping, you might be up to a minute or more. That’s normal. The tea is just taking its time at that point.
Some of my favorite cups have been the seventh or eighth steeping of a really good oolong. They’re quiet, deep, and slightly woody. The kind of tea you drink while reading in the evening, when the day’s noise has finally drained out.
My Honest Take on the Three Pieces I Use Most
After years of trial and error, here’s the real, lived-in review of the gear that’s actually earned a place in my daily routine:
The Easy Pour Ceramic Set is the one I’d recommend to a friend who wants to start brewing gongfu style without spending a fortune. It looks beautiful, it works well, and the rotating tray solves a real problem (drips). The only thing I’d flag is the pour has a learning curve, but that’s true of any small clay pot.
The Magnetic Glass Tea Maker is the one I’d recommend to anyone who wants the visual magic of glass brewing without the stress of timing. The magnetic lift is genuinely the easiest steep-control system I’ve ever used, and it turns tea brewing into something that feels a little special. The wooden stand is functional, not just decorative, and the whole thing cleans up beautifully.
The Magnetic Glass Tea Set is the one I’d recommend to anyone who lives alone or just wants a clean, modern daily setup. It’s the most “apartment-friendly” of the three, meaning it doesn’t dominate the counter, and it handles the morning “I need tea in the next five minutes” workflow better than anything else I own.
Are these the only three tea sets in my kitchen? Honestly, yes, for daily use. I have a couple of other pieces for travel, but these three get 95% of the action. That’s the highest compliment I can give a piece of tea gear.
Building Your Own Daily Ritual
I wake up, I boil water, I warm my mug, I put about 2.5 grams of a High Mountain oolong into the Magnetic Glass Tea Set, I let the water cool for about a minute, I pour it in, I set a three-minute timer, and I go do something else for those three minutes. When the timer goes off, I lift the magnet, pour my tea, and sit down to actually drink it.
That’s the whole morning. No ceremony. No fuss. Just hot water, good leaves, and three minutes of waiting that I’ve learned to actually enjoy.
On weekends, when I have more time, I drag out the ceramic set and do a long gongfu session while reading. The ritual scales up. On weekdays, it scales down. Both versions count as real tea drinking. Neither one is more “authentic” than the other.
The best tea ritual is the one you’ll actually do most days. The fanciest setup in the world, used twice a year, is just a decoration. A simple setup, used every morning, is a practice.
Final Thoughts: You Don’t Need Permission to Enjoy Tea
I spent the first couple of years of my tea journey feeling like I wasn’t doing it right. Not enough leaves. Wrong water temperature. Wrong vessel. Wrong leaf. Wrong country of origin. There was always some reason I wasn’t a “real” tea person.
The day I stopped caring about that was the day I started actually enjoying tea. The leaves don’t care if you’re brewing them in a Yixing teapot worth a thousand dollars or a $15 glass mug from the kitchen store. They just want hot water, time, and someone willing to pay attention.
If you’re just starting out, here’s my actual advice: pick a tea that sounds good to you. Pick a vessel that fits your life, not your Pinterest board. Brew it. Drink it. Notice what you like and what you don’t. Do it again tomorrow. That’s the whole thing.
Browse around, find a setup that speaks to you, and don’t let anyone, including me, tell you you’re doing it wrong. You’re just brewing tea. There’s no wrong way to brew tea. There’s only tea you’ve tried and tea you haven’t yet.